Thursday, April 26, 2012

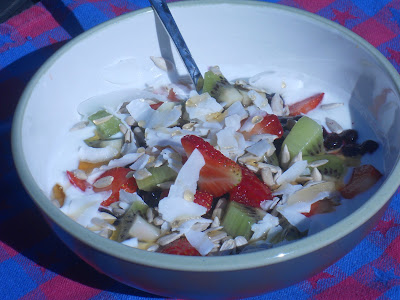
Homemade Yogurt

Photo by Life as a Healthy Mom
Can I get preface this post by saying "I love Pinterest!"  As much as I do in terms of making things from scratch and gaining new information about health, it takes alot of time researching, reading, and implementing.  What I love about Pinterest is that it has allowed me to look up stuff, such as recipes, from like-minded people rather than googling it only to have alot of websites show up that may or may not fit my needs.

Oh..........and it has opened my world in knowing there are ALOT of things that I can make at home without having to buy it at the grocery store.  And save money...I'm all about that, as long as it keeps with my healthy bottom line. 

Take for example--- YOGURT!  Seriously? I can make my own yogurt in a crockpot?  I had read many years ago that it could be done, but I had to buy this electric contraption in order to make it; at it was only for yogurt.  I refused to buy the $50 appliance just for the principle of it.  So I continued to buy my Oikos Organic Plain Greek Yogurt for my parfaits, and Stonyfield Organic Plain Yogurt for the smoothies, ranch dressing, and dip for the kid's veggies, and recycled the plastic container.  Well......not anymore (insert in the mad scientist laugh)!

I found this recipe on Pinterest for crockpot yogurt from a blog named Over at Julies, by Julie Backus. I followed her instructions on making it to the T (including setting the timer).  The only thing I changed was that I used kefir, which is a fermented milk drink made with kefir grains, instead of yogurt.  The yogurt I had in the fridge had pectin in it. Kefir has a little bit of a tangier taste, but it has so many more probiotic properties than regular yogurt.  Next time, I will use regular yogurt or a yogurt starter to compare the difference in taste.

I also strained 1/2 of the yogurt in cheesecloth to make a thicker greek yogurt, and left the other 1/2 in it's regular state for pourable yogurt. 

Here is Julie's recipe for Crockpot Yogurt:

This recipe uses a 3 quart crock pot.

Makes 8 servings.
INGREDIENTS

2 quarts whole milk

fresh or frozen variety of fruit

honey or maple syrup for sweetening yogurt and fruit

DIRECTIONS
  • Pour 2 quarts of milk carefully into your crock pot bowl.
  • Turn heat to low. Cover and heat milk for 2 hrs and 45 minutes. Be sure and use a timer!
  • When timer goes off, turn off crock pot, keep lid on, and set timer for an additional 3 hour “cool down” time.
  • After 3 hours, ladle 1 cup of the very warm, crock pot milk into a small bowl.
  • To the very warm milk add ½ cup of natural, live culture, no pectin added, "plain" yogurt, like Chobani Greek Yogurt. That's your starter to produce a batch of new, live culture, yogurt. Whisk together well. Pour milk mixed with yogurt back into crock pot bowl and whisk gently to incorporate.
  • Unplug crock pot. Cover with two bath towels and leave it to “culture” overnight for at least 8-12 hrs.
  • In the morning, place tea towel in colander and pour yogurt into towel-lined colander placed over a large bowl. Drain off 1 to 2 cups of whey. Whey is very healthy and can be used in place of water to make homemade breads.
  • Save out 1/2 cup of yogurt to use as starter for your next batch of Easy Crock Pot Yogurt. Starter should be used within a week. You may use homemade yogurt as starter 3 times before buying more natural, no pectin added, plain yogurt, like Chobani as your starter.
  • Yogurt may be stored in a large jar and dished out for individual use. With small, covered, individual containers: place chopped fruit in the bottom of each container, sweetened with 1 teaspoon maple syrup or honey; add yogurt and finish off with a little drizzle of syrup or honey and snap on cover.
  • Store in the refrigerator for a week. Yogurt will thicken as it cools, but you must try it before you cool it because the yogurt has such a delicate texture before it is cooled.
  • Whey will last 6 months in the refrigerator.

It turned out perfect! And I felt so empowered to know I can do this stuff at home and not have to rely on yet another container of processed food!  Enjoy! 


Wednesday, April 25, 2012

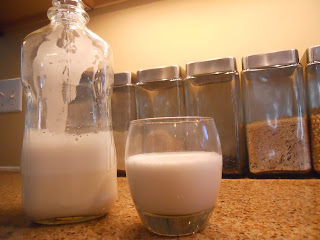
Homemade Almond Milk

Photo by Life as a Healthy Mom
Last week, I wrote a blog about things I do in my life that I feel help me become mindful of the Earth and it's resources that it provides.  One of them was making my own almond milk.  When I tell people that I make my own almond milk, some of them look at me quite strangely. My husband joked with me at first and asked, "how do you milk an almond?" and then proceeded to pinch his fingers together and pretend to milk tiny, minuscule, invisible utters. No honey, it's not like that.

For those of you who are lactose intolerant, vegetarian, vegan, or just want a change in your daily routine, nut milks are the way to go.  I tend to use it in smoothies and baked goods; and believe me, when I say that it is soooo simple to do.

I choose to make my own almond milk because:
  • almonds are chock full of essential vitamins and minerals, such as magnesium, potassium, copper, vitamin E, selenium and calcium
  • almonds are also high in monounsaturated fats
  • store bought almond milk contains synthetic vitamins and may not contain as much fiber as the homemade comparison
  • store bought almond milk also contains thickeners to make the milk more palatable
  • there are no surprise ingredients....what are "natural flavors" anyway?  You know what you put in it.
  • it has a more delicate taste, and you can sweeten it however you choose
And finally................nothing goes to waste.  I don't throw away a container after I am finished, and the leftover almonds are dehydrated to make almond meal.

Here is my recipe for Almond Milk:

Makes 3 cups

1 cup raw almonds (I buy them at Trader Joes)
3 cups water, plus more for soaking
1 tsp. vanilla
1 tsp sweetener such as maple syrup or raw honey (optional)
pinch of salt

 Pour the almonds in a bowl and cover it with filtered water. Let them soak in the water overnight.

Photo by Life as a Healthy Mom

 Drain off the water from the almonds.  Add almond to the blender.  Add 3 cups filtered water to the soaked almonds.  Blend for 5 minutes.  Strain mixture through a cheesecloth covered colander.  You can use the back of a spoon to push as much liquid out as possible.
Photo by Life as a Healthy Mom
Rinse the blender container, and add the newly strained almond milk back in the blender.  Add a pinch of salt, vanilla, and your choice of sweetener.  Blend for 1 minute.

Choose a reusable container.  I use a recycled milk container that I sanitize in my dishwasher.  Use a funnel and a small sieve to pour the milk into the container.

Photo by Life as a Healthy Mom
Label the container. 
Photo by Life as a Healthy Mom

You are done!  The liquid will seperate in the container, so just shake it up before each use.  And be sure to use it within a week.

Now........what to do with the leftover almond mush left in the cheesecloth.  See my blog about almond meal.


Almond Meal

Photo by Life as a Healthy Mom
Whenever I make homemade almond milk, I have this almond mush that is left over.  I didn't want to throw it away, or put it in my compost bin.  So I decided to put it to good use.  After I make my weekly bottle of almond milk, I always plan to make almond meal.  It's kinda like the book, If you Give a Mouse a Cookie, by Laura Numeroff that says, "if you give a mouse a cookie, he is going to want a glass of milk"....or something like that. So mine is "if you want to make almond milk, you will need to make almond meal afterwards."  Almond meal can be used in recipes as a replacement for flour.  For people with gluten intolerance, almond meal does not contain gluten.  I add it into cookies and muffins.  I also use it as a binder, instead of bread crumbs, in meatballs or meatloaf. 

If you plan on not buying as many processed foods, as our family has, it is a good idea to invest in a dehydrator.  I make almond meal every week, hence the need for a dehydrator.  Although we do use the dehydrator for a lot of other things as well.  But I digress.

So.......after making almond milk, there will be a kind of a mush left over in the colander.  Spread this mush in the dehydrator tray uses to make roll ups, and set the dehydrator to the setting based on the manufacturer's suggestion.


About 8 hours later, the almond much will be dry.  Add it to a blender and blend it into a flour.


Put the flour into a reusable contain and place it in the refrigerator.  If you do not plan on using it in the next couple of weeks, it can be placed in a plastic bag in the freezer. 


Thursday, April 19, 2012

Earth Day

Earth Day is an annual event celebrated on April 22 to show appreciation to our Earth’s environment, bring awareness to issues that may threaten it, and celebrate ways we can help protect it.  I love Earth Day.  My daughter claims Earth Day is “Mommy’s favorite holiday”; I just love her.  Not quite my favorite, sweetie……….although, it comes in at a close second to Christmas. 

I look forward to this holiday, not because of any big parties or festivals that I have planned to attend.  I hate crowds, so no big festival for me.  And it falls on a weekend, so no school activities, such as helping out at the paper drive, will need to be attended.  I love it because I know that we, as a group, are acknowledging that we need to take actions towards helping our planet’s soil, water, air, and inhabitant's health. As corny as it sounds, Earth Day should be every day in my opinion.  At least, it is for my family.  It has become part of our everyday living. 

But my now more relaxed, planet friendly manner wasn’t so relaxed as it is today.  I remember when the whole “green” movement was in full force and was sweeping across the country a few years ago.  Let me tell you, I was gung-ho.  If I read it was “green” and helped the environment, I bought it. And buying greener products meant more green out of my pocket.  Also during that time, I was learning about all the pesticides and antibiotics in our food, what CAFOs were, and the chemicals in shampoos and such, that I went on a frenzy being careful only to buy the healthiest food possible and choosing personal care products that did not put harmful chemicals in our bodies.  I gained all this knowledge and I wasn't afraid to use it!

I was driving myself and everyone around me crazy.  My husband began calling me “voodoo lady” -----don’t laugh because he was serious (in a loving kind of way).  I was working harder, but not smarter at this lifestyle change I was making for us.  No wonder I was overwhelmed.  Then one day, I had this “Aha” moment.  I realized that I didn't have to do the "being green" and also do the "keeping our body's free of contaminants" seperately, as my mind was processing it as to be.  It was all encompassing, meaning as I choose items for our home and bodies, made with natural products and not man-made chemicals, buying organic food produced locally and raised humanely, and becoming knowledgeable about living sustainably, it will ultimately be healthier for the planet. Once I figured that out, I became more relaxed, and I began taking baby steps in making change in our lives.  

There are hundreds of ways to be mindful about the resources we use.  I admit, I can get a little over the top with ideas when it comes to protecting the planet (remember voodoo lady?).  Some of them I can implement and have, and others I can’t, and that's okay.  Again.....it's all about the baby steps.  I will continue to go about my day making choices that I can feel good about.
Here is a small list of changes I have made over the past few years:

·         Composting— there are many things that can be composted and not thrown into the trash

·         Recycle plastic, glass, and paper

·         Reuse glass jars for spices, leftovers, or anything else that needs to be stored

·         Grow my own herbs and dehydrate them

·         Make my own dishwashing detergent

·         Make my own hand soap

·         Make my own laundry soap

·         Buy as much organic food as my budget allows. 

·         If it isn’t organic, it’s at least GMO free and free of artificial preservatives, flavors, and colors. I have contacted companies asking questions about their products too.

·         A lot of our food is homemade and unprocessed.  Also, it saves on throwing away excess packaging.  And............it tastes better anyway.

·         Make my own spice blends.  No MSG in our home.

·         Every few months, I go to my local recycling center to turn in old textiles, such as holey socks, torn towels, stained clothing

·         Our newly installed rain barrel allows me to water all my container plants without turning on the hose

·         Shop resale stores

·         Donate gently used items

·         I have been known to throw a killer of a garage sale.  One garage sale netted me enough money to purchase a chest freezer so we could purchase meat from a local farm. 

·         Make my own almond milk on a weekly basis, and dehydrate the remains for almond meal

·         No harmful fertilizers on own lawn.  We had children and pets running it that yard!

·         Turn off the water while brushing teeth

·         Buy Recycled paper products, such as toilet paper

·         Grouping errands together to save on gas and less wear and tear on the car

·         Using our legs for walking and riding our bikes as forms of exercise

·         Visit the library to check out movies and books

·         Waste free lunches

·         Make my own cleaning products

·         Use natural and homeopathic remedies

·         Recently replaced all of our appliances for energy star ones

·         Buy “safe” personal care products or make my own, such as deodorant

·         Recycle all of our electronics

·         No buying of bottled water.  We have reusable water bottles.

·         Repurpose items, such as making a necklace from an old T-shirt 

·        Refusing to buy items just because they are on a clearance rack, or I think I am getting a good deal.  Do you really need all that stuff in my house anyway.  If I don't need it, then I don't buy it!

·         Use cloth bags when shopping.  And if I forget to bring them, I make sure I recycle the plastic ones. 
Now multiply my little actions by the billions of people on this planet, and we will ultimately affect the planet and its resources, just by the choices we make.  I would like to think we do so already.

And what will I be doing on Earth Day, you might ask?  I will celebrate it quietly.  I may spend time outside gardening, go for a walk with my family, take a bike ride to a nearby park, or make a healthy meal for friends and family.  One thing I know for sure is that I will spend a moment remembering to be mindful about the actions I take as I go about my day; on Earth Day, as in every day. 
Happy Earth Day!

Monday, April 2, 2012

Naturally Dyed Easter Eggs


Photo by Lisa Fulsom

In my quest in making mindful choices in my life, I decided this year to forgo the fizzy-neon colored pellets to color Easter eggs........instead, using all natural sources to color them.

I wanted to make a dry run of this before our annual egg-dying event with the family on the day before Easter.  I decided to use the following to color my eggs.  I put the ingredients for the color I wanted into each cup.  I also decided to use brown and white eggs, to see how much of a color difference I could achieve.  I didn't want to use too many different food sources, so I stuck with the 5 simple ingredients. 
 

Egg Color
Natural Colorant

Yellow
1-2 tsp. Ground Turmeric Powder
Purple
2 tbsp. Grated Beet/ 2 Tbsp. Chopped Red Cabbage
Green
1-2 tsp. Ground Turmeric Powder/2 Tbsp. Chopped Red Cabbage
Blue
½ c. frozen blueberries/2 Tbsp. Chopped  Red Cabbage
Orange
2 Tbsp. Ground Paprika
Pink
2 Tbsp. Chopped Cabbage

After the eggs were cooked, I placed them in a bowl of ice water.  I brought the pot of water that I used to cook the eggs back up to a boil.  Once the water was boiling, I used it to fill all the cups with each of the ingredients above about 2/3 full.  Then I added about a teaspoon of white vinegar to each cup.

Once the eggs were cooled, I added them to the different dyes.......and waited.  I learned this is not a quick process.  Concerned that the eggs were out of the refrigerator too long, I put all the cups of dye with the eggs in them in the refrigerator.  About two hours later, I checked the progress, and to my surprise, many of the eggs were dyed to a color of my liking. I took them out of the dye, and let them dry. 

Other than the time it takes to dye the eggs is a bit longer, I am so happy with the results.  The orange color was on the coppery brown side, but the blue and green color were very subtle and pretty. The pink colored egg came out as a soft pink. The brown eggs didn't give much of a color change, other than deeper shade of brown and gold, so I think the next time I will just use all white eggs.  The kids thought it was pretty cool that they were going to dye eggs using other food, so I told them to think up some foods we could use when we dye eggs on Easter Eve.

I am glad that I decided to be mindful about what methods to use in dyeing Easter eggs this year. 

And the bonus is I had zero waste:  the water I used to cook and cool the eggs went into watering my container garden outside, and the leftover dye and food wastes to make the dyes went into the compost.  It was a win-win situation in my book!